Showing posts with label Furniture Refinishing. Show all posts

Jan 11, 2010

Refinishing a Bookshelf...my 1st attempt at repainting something!

Here is the finished product!!!  Yeah!!! 
It turned out great and is a lifesaver in the classroom
since there are LOT's of shelves on the back to store math 'stuff'!

Ok...let me try this for the 3rd time!!! I just got a new laptop and for some reason, I'll be typing and my works are self select themselves and then erase when I push the next key. So anyways, can I say that this project has been a pain in my hoodas??? And you may be asking what's a hoodas...well think umble butt, junk in the trunk, bootie...well I think you have the idea. I could go on for days about trying to get the stuff cleaned up, but finally decided the part that had dried was a bit easier to scrape. It wouldn't scrape all the way off so I borrowed a hand sander. That didn't work so bought the lowest grit sandpaper at Home D-pot and used my husbands grandpas little wooden manual sander to take off the many layers of paint. Between the 40 grit, and some wood filler, I got the gummy mess to at least look presentable. I'm a bit of a perfectionist when it comes to doing things, so this has gone against every grain in my being to leave some of the bubbly mess under my final coat of primer.


I go to Home D-pot looking for some "expert" advice on what type of sandpaper I need (I'm thinking 40-80 grade). Anyway, the guy says "Oh no, you have to strip the puppy". Ok, he didn't say puppy but he took me over to the paint strippers and said this HAD to be my 1st step. Well, let me tell you that was NOT expert advice. I took the stripper home, got all decked out in my protective gear, and began spraying. (He also said to get the spray can type to make it easier). I couldn't wait to get going with my scrapper and waited the alloted time. Mind you, I only sprayed the top of the bookcase and top shelf to make sure I had enough time to scrap. Well, it came time to scrape. Well, scraping bubble gum consistent goop was NOT FUN! Seriously, the crap was like bubble gum and involved several coats of paint.

Anyways, today we got the 1st coat of paint and BigJ and LittleA helped me out. They love to paint, which used to be a pain in the hoodas...but today, it was a BIG help to have them painting along with me! Luv those boys:)

Oct 28, 2009

Rocking Chair Redo...Gogo would be so happy!!!

Tim's grandmother, aka Gogo, gave us a beautiful antique rocker several years before she passed away. She has been gone at least 5 years, and I just been to cheap, and recently to poor to pay several hundred $$$$ for a 'professional' to recover it. Sooo....in my late night blogging several months ago, I found a tutorial on The Cut Cloth. But when I found that one of my blogger idols, Sarah at Thrify Decor Chick, had recovered her dining rooms chairs, I thought...'Hey, I can do this!!!'

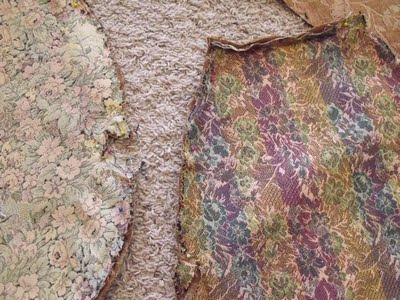
So here are the BEFORE photos. I actually had a pillow on the seat because as you can see, there was a BIG hole where you put your tush! I think the black stuff is actually horse hair so it was also very messy!

Friday night became my 'get er done" night. I popped in my Redbox video (LOVE those machines), pulled out the fabric that I bought at Joanne's many moons ago (with a 50% off coupon of course) and got busy. I used a flat head screw driver to pop out the upholstery tacks.
I also got a pair of wire cutters (only because I couldn't find my needle nosed pliers. Those darn boys of mine use my tools for pimping their scooters!!! That's a whole nuther blog post!!!
I took photos of each step, mainly because I was a little nervous about putting everything back the same way! I do have to say, it was not as bad as I imagined. After removing all the staples...which took 3 hours...I took the old fabric and used it as a pattern for the new fabric.

Turns out the wood was in pretty good shape, other than a few good nicks I made with my tools! I just took some Old English scratch filler...which I use on my laminate floors that aren't supposed to scratch!!!.. and polished it all with lemon oil. Good as new!!!


Next I started reassmbling everything using my handy dandy staple gun.
I started pulling and stapling and stapling and pulling the new fabric back onto the wood frame.
The padding was pretty comfy, so I decided to salvage what I could. For the big hole, all I did was add a few layers of fiberfill (that I got for 10 cents a bag at Big Lot's after Christmas last year). SCORE!!!

I learned to sew from my mom and in 6th Grade Home Ec (thanks mom & Mrs. Grace) so decided to include trim...like the orginal. I just used some of the new fabric and that's what you see at the very bottom of the seat.

Kept pulling and stapling, stapling and pulling!

Antique Rocking Chair Reupholstery Reveal

Tim's grandmother, aka Gogo, gave us a beautiful antique rocker several years before she passed away. She has been gone at least 5 years, and I just been to cheap, and recently to poor to pay several hundred $$$$ for a 'professional' to recover it. Sooo....in my late night blogging several months ago, I found a tutorial on The Cut Cloth. So here are the BEFORE photos. I actually had a pillow on the seat because as you can see, there was a BIG hole where you put your tush! I think the black stuff is actually horse hair so it was also very messy!
The last step was a bit more difficult...until I decided the upholstery tacks were just not going to cooperate for me. The original trim has upholstery tacks holding it onto the frame. But I think this chair was created before the trusty glue gun. So, I just got out the glue gun and glued the trim onto the fabric.


TAA DAA!!! Here is my beautiful antique rocking chair all redone and all pretty!!! Isn't she loverly!!


It's a chair that I told my boys is for "pretty looks". That means NO SITTING IN THE CHAIR BOYS!!! It actually sits in the corner of our master bedroom, which means it's a fancy clothes hanger. But now that she is so pretty, she'll be clean and clear and strutting her stuff!

Oct 27, 2009

Bonus Room Decorating...Rocker Redo!

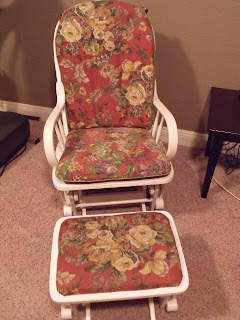
We all have those comfy rockers that we used when we had babies in the house. They are comfy, but not to pretty on the eyes. One of my friends gave me her rocker, and I just haven't parted with it because we use it in the game room to play Wii. Oh look...there it is with the red floral cover. It was actually a hideous pink and blue early 80's color, so I sewed new slipcovers for it was Jake was born 10 years ago!


I finally could take the white walls NO MORE. The game room HAD TO BE DECORATED!!! So, with some design suggestions from Sarah at Thrifty Decor Chick...and a few ideas I've had brewing in my mind from looking endlessly at other blogs, I decided it was time to get busy. I'm using chocolate brown and blue accents and bought some dark brown paint for the walls. I bought the paint years ago. However, I had painted so many rooms in the house when we moved in that my motivation ran out long ago! I was 3 rooms shy of completion. When the color finally made it on the wall, it was a bit more deep olive green than chocolate brown but hey, re-painting...NO THANKS!!! Plus, I don't have the funding for another couple gallons of paint. See color behind the chair. It's actually growing on me.
So I was shopping at Joanne's and found some awesome chocolate brown and blue fabric that would be PERFECT for the slipcovers. Only problem, it was a remnant. GOOD because it was on sale. Bad because there wasn't enough for the chair. So I've been searching high and low to find something that matched. I finally found something at Home Fabrics...and it was on sale for $3/yd and I only needed 1 yard...just enought to cover the underside of the chair pad, which nobody will see anyways. I also using it for the piping because it's a itsy bitsy greyish blue checkers which will be the perfect contrast.


I just took off the cushions and used them as a pattern to cut out the new cushions. And that's where I'm at. I was going to finish it tonight, but instead I've been blogging since 5pm. Hello!!! Can you say addiction. Now what I want to do is spray paint the frame a walnut brown and finish the cushions this weekend. We have a LOVELY holiday in Nevada called 'Nevada Day'. It's our states bday and we always get Halloween off because it's a state holiday. YIPPEE! I promise, finishing the chair will be my Nevada Day project.